I chose to work on my artistic impression images this month. Mostly, I wanted to dive into the new Topaz Studio 2, and also just have a chance to play around and have some fun with my images. Working in Studio 2 proved to be a non-starter, but I certainly had a great time exploring and creating interesting images.
What’s new this month
I’m sad to say I didn’t fulfill my goal of actually getting out shooting this month. As the weather is quickly turning colder and darker, I know this has been a real missed opportunity, but I can’t go back in time, only move forward. I am hoping for a combination of free time and decent weather soon so I can actually put my camera to use.
5 favourites of the month
Head on over to my gallery page for more of my favourite images.
What’s coming up next?
I’ve not actually chosen a topic for October; I think it will be a freestyle month. I still have a lot of bird images I would like to work on, and I have been really enjoying playing in Topaz Studio creating my artistic impression images, so we’ll just see what happens. Check back each Sunday for a new post.
This post was originally going to be the big five, but I had images of cheetah and wild dog that I wanted to play around with, so the magnificent seven it is.
One of the reasons I wanted to focus on my photo art this month was to try and learn a bit more about Topaz Studio version 2. I’ve played around with it a bit, and watched some tutorials, but for the workflow I am using, at this stage I will be sticking with version 1. The issue that I was finding is I can’t get files to make a round trip using On1 Photo Raw. I can get the file into Studio 2, and work on it, but the only option for saving is an “Accept” button, which with the workflow I am using, appears to do nothing. I select it, but the file doesn’t get saved, exported or anything else. New software versions are typically a bit buggy, so I’ll give it a few update cycles and then play around with it again and see what happens.
One of the great things about photo editing tutorials is getting the little reminders for things that are outside of the normal workflow. In this case, the reminder was to play around with blending modes when using AI Remix, Impression and textures. For example, the cheetah image below was edited using (amongst other tools) a filter in AI Remix called Neon Rise. But changing the blend mode from normal to luminosity kept the amazing texture that the filter offered, but eliminated the wild and crazy colours for something far more subdued, and suited to the image.
I hope you enjoy the selections below. Wishing you a fantastic week ahead.
You can find some of these images in the Photo Art section of my gallery.
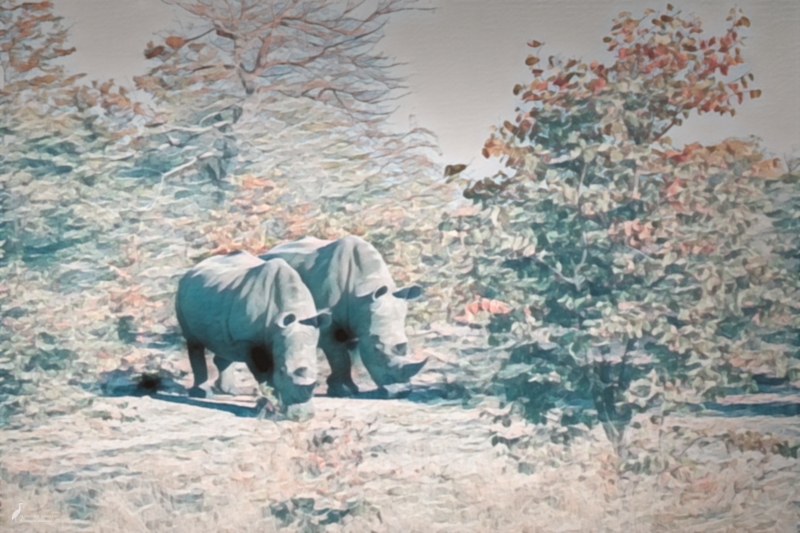
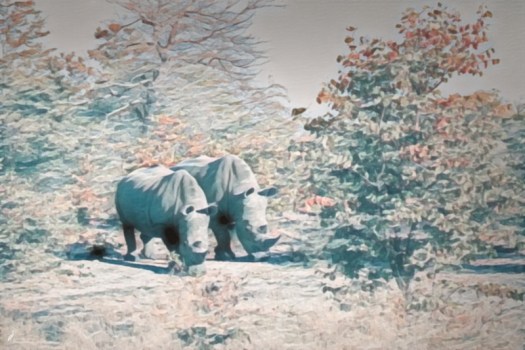
Today is World Rhino Day, so I decided to combine that with my photo art project for the month, and edit some of the rhino images I took on my last trip.
I won’t go on and on about the plight of the rhino, and of the greed, arrogance and ignorance of humans that has fuelled their decline and cluttered news feeds with horrifying photos of poaching. Other people can do that far better than I.
I simply want to live in a world where rhinos can live in peace. And I will hold that thought in my mind and in my heart, and hope that it becomes a reality.
As with all the other posts in this series, these images were created from photos I took, modified primarily using Topaz Studio to create these effects.
As much as I had hoped that my photo art topic would allow me to get comfortable with Topaz Studio version 2, I haven’t actually even tried it yet. Fingers crossed that this week coming up I can make some time to a watch a tutorial or two and get familiar with the program operation, but for now, I have stuck with the original version, and I am really happy with the results of this weeks experiments.
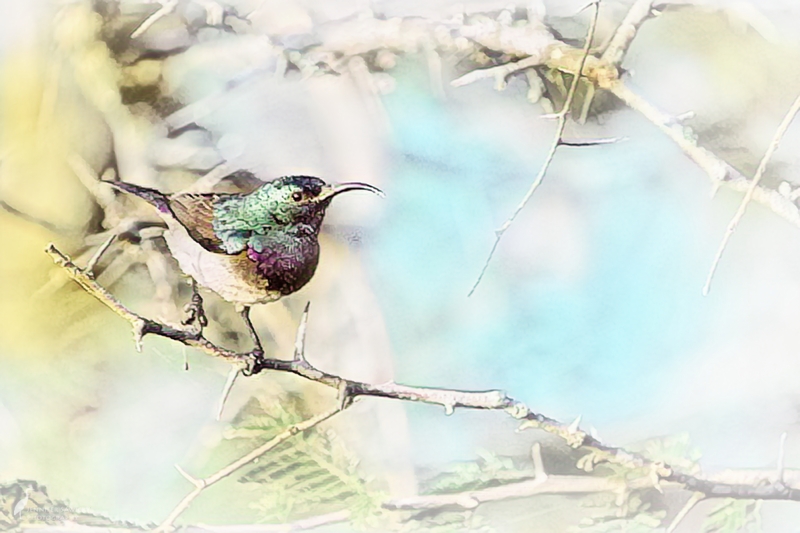
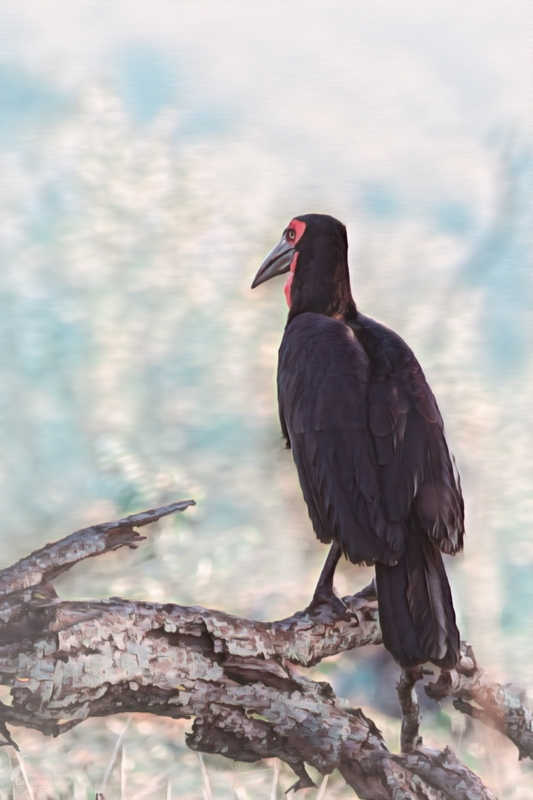
I decided to focus on birds this week, and played around with two basic combinations of software. The sunbird and hornbill were edited primarily using the Topaz AI Remix module, while the rest were done with Impression (along with the usual basic edits to start for tone, cropping, etc.).
Do you have a favourite this week?
I hope you enjoy, and wishing you a great week ahead.
This week, I felt inspired to play around in Topaz Impressions and create some of my artistic impression images. Or as I like to say, what I would paint, if I could paint :).
Next week, I am going to try and work with the new AI Sky Enhancer that Luminar just released.
Wishing everyone a fantastic week ahead!
A young elephant seen on an early morning game drive.A leopard scanning the horizon at sunset in the Okavango Delta.A regal lion laying in the tall grass just after sunrise.A large warthog moving through camp.A fiery sunset – Africa has the most expressive skies!
My month of Topaz Studio is coming to a close. As with my month of Luminar, taking this time to dive into the program has left me feeling a lot more confident using it, and now it is another tool in my photo editing toolbox that I can use to bring out my vision in the images I have created.
Rather than focus on one specific thing for this post, I wanted to share some of my favourite things about the program.
Bringing out amazing contrast and detail
Back when I used Lightroom and Photoshop, Topaz Detail and Clarity were plugins that I would use when I wanted to highlight texture, especially in feathers and fur. The precision contrast and precision detail adjustments are the same tools found in detail and clarity, though they are still available as the plug in versions or as clarity and detail in studio, which give access to all the fabulous presets that those programs had. On this cheetah image below, I decided to use the precision contrast and detail rather than the in studio version of detail and clarity. Since these are sized for the web, some of the fantastic texture of the fur may be a bit lost, but it is definitely there.
Prior to editing, this cheetah doesn’t look bad, but not great. Keep in mind that this is a raw image and no matter what, it needs some editing to look its best.Using Topaz Studio, I was able to use precision detail and contrast to really highlight the beautiful texture of fur on this cheetah. Cropped for composition and the usual colour correction adjustments completed as well.
Creating my artistic impression images
I’ve always enjoyed the Topaz Impression and Simplify plug-ins, allowing me to create painterly and whimsical effects to my images. Sometimes over to the top, sometimes subdued, those programs allow me to create something different with my images, and I love the flexibility they give me.
A bull elephant crossing the Boteti River to join other members of the bachelor herd that had congregated on the other side earlier in the day. This version was created in Topaz Studio using some of the adjustments, and then working in Impression in Studio until I had the dreamy feel I was looking for.
Quickly reviving lost detail
I think my favourite discovery in the Topaz Studio program has been the AI Clear adjustment, and it is one I am absolutely going to purchase to make sure I have it available to me. Many times I find myself out and about with a great scene in front of me, or a moment I want to remember, but the light is fading or there are deep shadows or perhaps fog (sometimes all of the above). I have found that the AI Clear adjustment can really get images like these back from looking grainy and soft, to full of detail and life. It’s just one step in the editing process, but it certainly is a powerful tool.
The unedited version of Wild Dogs in the Okavango Delta. This group was far enough from the vehicle that I was shooting at 300mm. Knowing how quickly the dogs move about, I shot at f11 and 1/800 sec to try and keep as much of the group in focus as possible, and freeze the motion. These choices meant I was at ISO 6400, leaving a lot of noise in the image.Cropped for composition purposes, and then edited in Topaz Studio. I used quite a few adjustments, but I still had the image finished to my liking in only a couple of minutes. AI Clear did a good portion of the work at the start of the editing process, tidying up the noise and bring back detail to the eyes and the fur, especially to the alpha pair that are on the far left.
I have really been loving the ease of adding my watermark to my images; it is certainly less cumbersome than that current way I have to do so in On1. One of the drawbacks I have found with Topaz Studio is not being able to resize and export directly from the program. It means that for images being posted to the blog or my Instagram page, they always need a round trip back to On1 in order to be resized and exported. Not a deal breaker at all, but just adding an extra step to the process.
If you don’t have it already, I would absolutely recommend downloading Studio and trying it out. Given that the program is free to use with several adjustments, and there are 30 day trials for all the others, there really is nothing to lose (except maybe a little space on your hard drive) to give it a go.
So far I have been concentrating on learning to effectively use Topaz Studio for standard editing, like I would do through On1 Photo Raw or Luminar. I still have a ways to go to figure out exactly how this would work into my regular workflow, but I decided to do a departure this week and play around with photo art instead. I watched a few tutorials during the week and one of them featured a new (to me) adjustment called AI Remix. The effects that the presenter was creating looked really interesting, so that’s where my focus has been this week, along with the more familiar to me adjustments through impression and simplify.
This first image was shot with my Panasonic camera whilst in Botswana, and it was after the sun went down so the image was incredibly dark and noisy; completely unusable as a regular photograph (just being 100% honest). But, I loved the posture of these two bull elephants jostling in the shallows of the Boteti River, and knew I could make something fun with the image, even if it wasn’t an something that I would traditionally mark as a keeper.
For this image, I did some basic adjustments first to brighten the image and remove some of the noise, and then played around with a combination of AI Remix (Platinum Rose) and Glow. For me, the posture of the trunks was the most important element of the image, and I feel the boosted saturation of greens and oranges behind the elephants really helps to showcase their shapes.
This next image is of a goliath heron. I wanted to simplify the details without losing all the texture and pattern of the feathers, and bring out colours and tones that reminded me of old film images. The result looks like a cross between a painting and a snapshot from an old point and shoot camera, but for me the image works. Perhaps because it brings back memories of the type of pictures I would see around cottage properties when I was younger.
A goliath heron spotted along the banks of the Boteti River in Botswana.
This last image is bit hectic, but it fits with the subject, the amazing African Wild Dog. The combination of adjustments I used diffused the background significantly, but in doing so brought out repeating patterns of triangles in the vegetation which corresponds with the triangular shape of the dog’s ears. It almost feels like the dog rushed through a huge pile of fallen leaves and quickly laid down, while the leaves slowly drifted back down to the ground.
Creating painterly images or abstracts from photos isn’t everyone’s cup of tea, but it is something I enjoy playing around with once in a while. Topaz Studio definitely provides a lot of different options to use to create these types of images. Because I own the Topaz plug-in collection, I have access to a lot of these tools that aren’t available within the free portion of the software. The AI Remix adjustment is one that I currently have on trial, and it’s something I would need to experiment more with to figure out if it is a tool I’ll want to have available once the trial period is over.
I am continuing to enjoy working in Topaz Studio, and now that I am getting more comfortable with the interface, I am starting to notice some differences that may affect how I use the program for future images.
First off, I have noticed that there can be a dramatic difference in how Topaz renders the raw file prior to having any processing done, and it seems to be very dependant on which camera I was using. This lion image was shot with my old Nikon D610 (which I traded in late last year for a Fuji XT-2).
This is the unedited image, exported from ON1 Photo Raw.This is the unedited image from Topaz Studio.For comparison purposes, this is the raw file out of Luminar. The results are quite similar to the On1 version, especially in terms of the colour rendering.
As you can see, with this image there are fairly dramatic differences in the colour rendering, the amount of contrast and detail in the image, and how bright the image is. The raw file appears to have a significant magenta cast in the Topaz file, compared to a more neutral tone in the On1 raw file. I have been finding colour correction a bit tricky with Topaz so far. I think of all the tools I have available to me, Luminar does the best job at correcting colour and especially removing colour casts.
But, even though I started from a different spot editing the raw file in Topaz than I would have from On1, I am happy with the results I was able to get with the image.
Here is the finished image. I spent time with this gorgeous lion early one more whilst on Londolozi Game Reserve in South Africa. May, 2017.
With this next image, the difference in colour rendering was far less between On1 and Topaz Studio, so as with all photo editing, images do need to be looked at on a case by case basis. The landscape image below was shot with my Panasonic FZ1000.
The unedited raw image from On1 Photo Raw.The unedited image from Topaz Studio.
In contrast to the lion image, the raw file in Topaz Studio looks better to me than through On1, a little bit brighter and with a bit more detail.
Here is my final edit of this image through Topaz Studio. I was able to bring out depth of colour and detail in the image, without completely removing the grainy haze from the sand storm that was kicking up in the distance. Taken at Hoanib Camp in Namibia, April 2017.
Here is an image from this summer, shot with my Fuji XT-2. I sure miss sitting outside watching the hummingbirds zip around the yard.
Unedited from On1 Photo Raw.Unedited from Topaz Studio.
The difference in rendering on the Fuji files is far less dramatic. The one out of Topaz looks flatter, but that’s what the editing process is for.
Here is the edited image:
Edited through Topaz to bring out the detail, and get rid of the distracting elements of the background (in this case by cropping them out). On second glance I could have made the image a bit brighter, but since the purpose of this exercise was to look for differences in how the raw image looked, I’ll leave it as is.
After doing a few of these image comparisons, I am finding that there is a consistent, dramatic difference in the way On1 and Topaz render files from my old Nikon camera, with the files being significantly more “true to life” in the On1 rendering. Since I don’t have the Nikon anymore, this isn’t an issue that will plague me beyond finishing up the backlog of images I have that I would like to edit, so I can make smart choices about what software to use when. The differences between the raw rendering with files from my Panasonic or Fuji cameras is not so dramatic, and if I am using Topaz Studio, I have a better starting point with files from those cameras than I do with the Nikon files.
As I mentioned in my August in Review post, I am going to spend the month of September diving into the Topaz Studio system. I had the full suite of Topaz plugins that I used to use with Photoshop, but the primary resources I used were the Impression and Remask plugins, and I never really spent the time learning the ins and outs of the others. I could utilize them, but I was never familiar enough to be sure which one I needed or to be able to use them to their full potential.
I spent some time this week watching a few tutorials to get a feel for properly using the Studio interface. I had found a few things were not intuitive for me, and watching the tutorials definitely helped. Studio comes with 10 free basic adjustments, and several of the Pro adjustments are included if you previously owned other Topaz products. They also have an option to try Pro adjustments for 30 days before you buy them, so I am going to trial a few additional adjustments that I have seen on the tutorials I have been watching. I have a feeling that may be a bit costly for me, as I have watched and now tried the AI Clear adjustment (which is pretty amazing), but we’ll see how things go once we get to the end of the month.
Below are links to tutorials I have watched so far. The Topaz Labs page on Youtube seems to have a lot of information and taped webinars, so I’m sure I’ll have more to share as the month goes on.
Topaz Studio can do a lot of things, including edit Raw files and save in multiple formats. But there isn’t an option for exporting and resizing for web, so while I am going to try and do all my adjustments through Topaz, I still have to take the files back into On1 to export at the proper size for uploading to the blog or to my Instagram page.
A few other differences to On1 Photo Raw and Luminar that I have noticed are the colour temperature under the basic adjustment is a simple temperature and tint slider, rather than having to opportunity to quickly try different colour temperature presets (daylight, shade etc).
I’ve not had a chance to edit as many photos as I would like this week, but I am impressed with the results of what I’ve had the chance to work on. I’m posting 3 before and after images for reference; if anyone is interest in the adjustments I used to create the final images, please let me know and I will post screen shots.
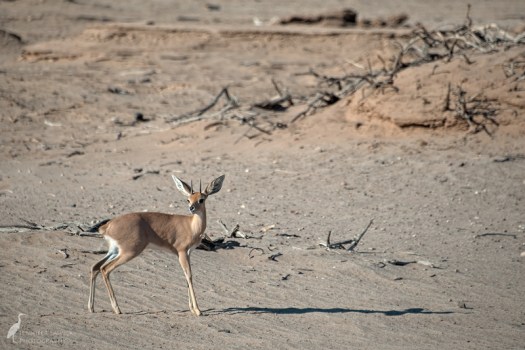
Here is a steenbok spotted near the Hoanib Camp in Namibia:
Before editing in Topaz Studio.After editing in Topaz Studio.
An oryx, also spotted near Hoanib Camp:
Before editing with Topaz Studio.After editing with Topaz Studio.
A springbok spotted while on a game drive in Etosha National Park:
Before editing with Topaz Studio.After editing with Topaz Studio.
The springbok image is the only one that I tried using some presets with. Topaz products such as clarity have the presets for the plugin available for the app. Using a preset, and then carrying on with other adjustments, was something that I had struggled with on my first pass with the program, but the key is to hit the apply button after working with one preset before moving on to the next. If there are any other Topaz Studio users that are struggling with that, I can post a couple of screen shots, but I found the answer while watching the Youtube presentation linked above featuring Hazel Meredith.
Well, that’s all for this week. I am hoping by next week to have had lots more options to put studio to the test and see what I can come up with.